Wednesday, February 10, 2016

Downy Unstopable Beads


I hear this is really awesome and smells so good and cheap to make. And you can spray it on furniture and it won't leave any residue! You'll need  a quarter cup of the Downy beads, four tablespoons of baking soda and one cup of boiling water! Plus, of course, an empty spray bottle.


Start by combining the quarter cup of beads into a bowl with the baking soda and then pouring the boiling water on top. Stir everything together and let the mixture sit for at least 30 minutes or for however long it takes for all of the beads to dissolve.

Then, use a funnel to pour the mixture into your spray bottle!

Use the spray on pretty much anything. It works great on carpets, furniture, clothes, curtains, rugs, etc. Your dog will even love it on their smelly bed, and it doesn’t leave a residue or film behind.


Thursday, June 5, 2014

Oh my goodness it's been awhile since I've posted! Amazing how time flies when you're having fun! :) I was looking through Pinterest earlier today and ran upon this cute lil way to store your earrings. I thought I'd share!

I thought this was very cleaver, what do you think? 

Friday, February 7, 2014

Cute Little Valentine's Blocks

Well it's exactly one week until Valentines Day! I found these cute little Valentine Blocks over at Simply Kierste's Blog. Follow the link to her Blog and see how she made these cute Valentine's blocks.


I love visiting other Blog's and getting inspired to CreAte!
~Happy Valentine's Crafting, thank you Kierste~

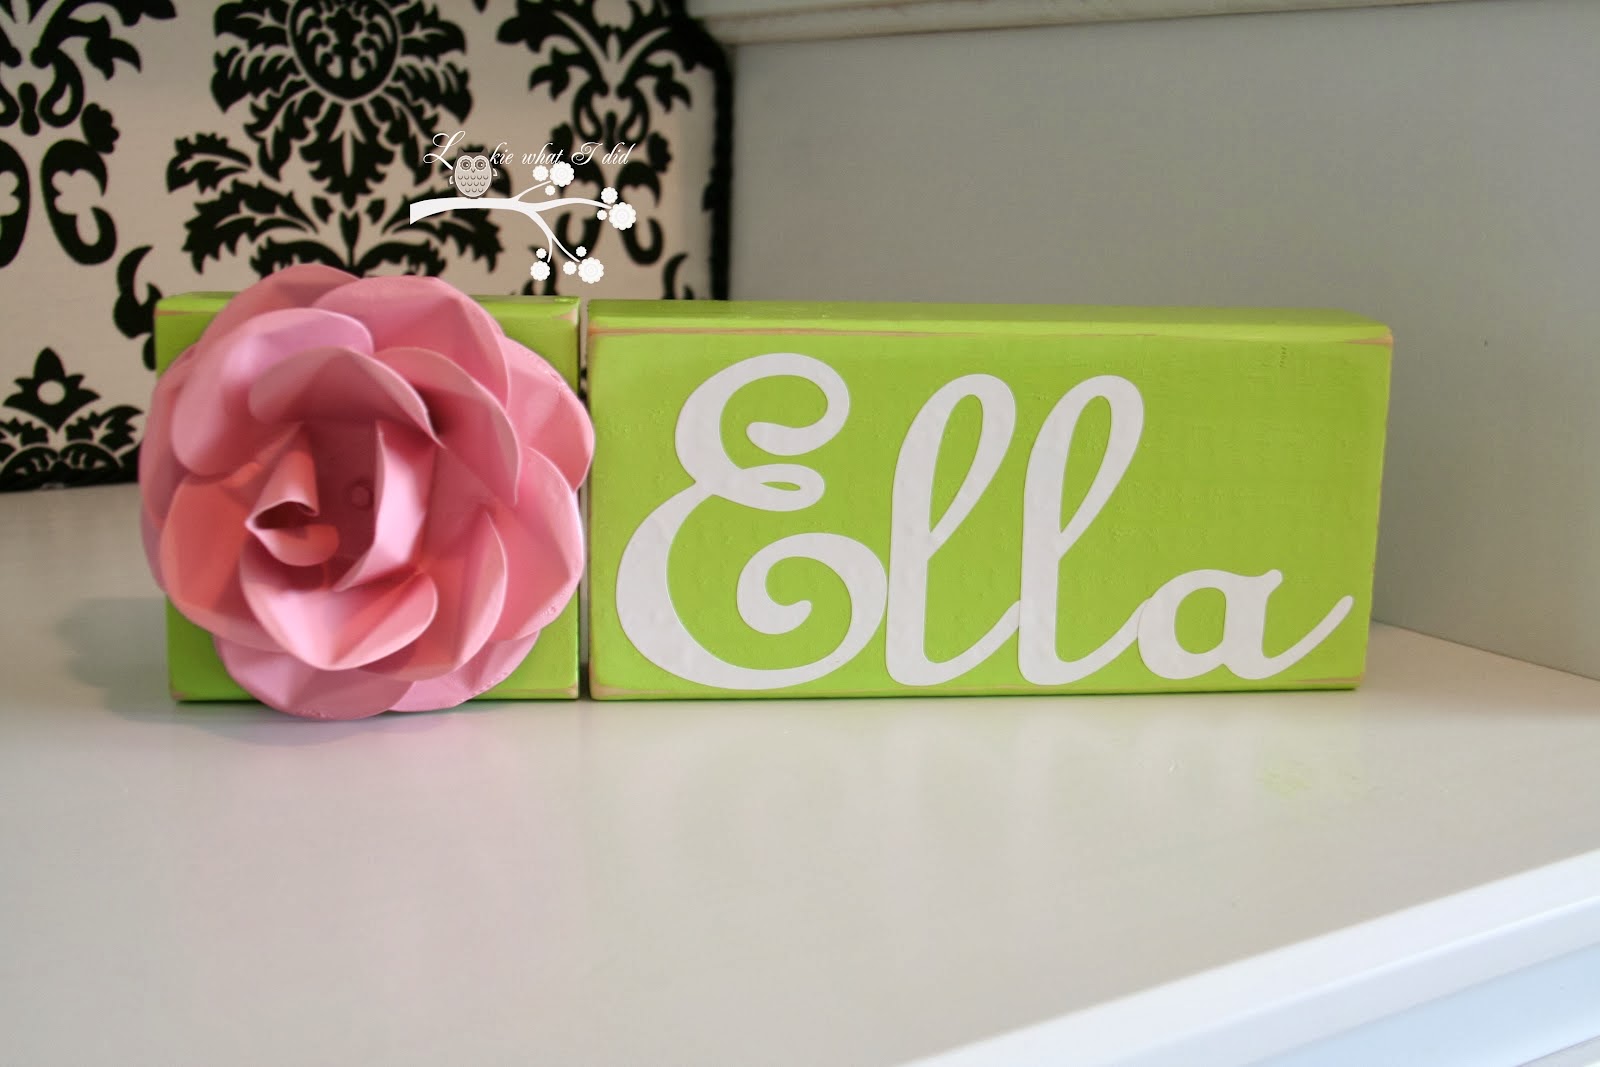
Personalized Baby Blocks- A Baby Gift


I saw this post over at Lookie What I did Blog and I think it's just too cute, would love to do this the next time someone has a baby! Stop on by her blog and take a look! :)


I have been waiting to make the perfect baby gift for my friend's cousin and when I came across these cute blocks over at Brown Paper Packages and I knew that this was exactly what I wanted to make. I love it when I can get inspired from another blog and her blog is chalk full of amazing ideas. If you have never visited Kierste's blog, please go to Brown Paper Packages as soon as you can. You will be amazed at her creativity!

Here are the blocks I made...finished, packaged and ready for delivery...


Here is what you will need to make these cute baby blocks...

Blocks (Any Size)
Vinyl
Spray Paint
Sandpaper
Metal Flower (or any other embellishment)

Here are the blocks before they were painted...


I used Rust-Oleum Painters Touch in Sweet Pea and Green Apple. This spray paint is the best spray paint I have ever used. It provides great coverage and doesn't run...I get mine at Home Depot and there are so many colors to choose from too!


Blocks after two coats of spray paint...


I used my Cricut to cut out the vinyl and I used the Songbird Cartridge.

Here are the blocks after applying the vinyl and gluing the metal flower I spay painted with the Sweet Pea color. I aslo distressed the blocks with a 100 grit sand paper. 


As Ella gets older, she can just take away a couple of the blocks and just have her name in her room...


This was a super easy project and I am so thankful I saw Kierste's blog to get the inspiration. I packaged these cute blocks up with some clear cellophane and pretty bow. I know that any new Mom would love to have these blocks as a gift!


Turn a Shadowbox into a Charging Station- I found this over at www.lookiewhatidid.blogspot.com and I thought it was a very good idea.

Several months ago, I had an "AHA" moment when I came across a shadowbox in Michael's on clearance for $9.00 (original price was $60).  I snatched it up quickly but at the time I wasn't sure what I was going to do with it until I got home and discovered it would be a perfect charging station if I just flipped it upside down...Let me show you what I did....


I started with a shadowbox just like this from Michaels, except mine was a burgundy color that I painted grey.....


Below are the steps I took to transform a simple shadowbox into a charging station....

{The pictures below were taken after everything was finished.  I lost my camera card with all of the before pictures...sorry}

Step 1 - Take the back off of the shadowbox and flip it over (glass is facing down)


Step 2 - Drill a "pretty" hole in the back for the power strip cord to fit...


Step 3 - Install a power strip through the "pretty" hole you have drilled.....


Step 4 - I used 3M Command Velcro picture hanger strips to the back of the power strip.  Now the power strip can be securely placed on the back of the shadowbox.....


Step 5 - Plug in all of your electronics...


Step 6 -  I replaced the back of the shadowbox with a flat wood platform to hold the cell phones, etc that my Dad built.  He cut 5 notches so the cords could fit in but now slip down and he even built a stand to place the iPad on.....

BEFORE
Here is the ONLY picture I have of it before it was painted....


AFTER
Here is the picture after it was painted and simple labels added.  I got the labels in the scrap booking department at Michaels.


Closer picture of labels.....


Picture of the back of the shadowbox (not the prettiest)..


More pictures......


I even had room to add a decorative little bowl to hold my car keys and loose change.....


I am so happy that I had an "AHA" moment and could not be more thrilled with this project.  The charging station sits on a small kitchen counter and doesn't take up any working space in the kitchen.

Thursday, February 6, 2014

BFF's Birthday!

Last Saturday was my best friends birthday! On a budget sometimes we have to be clever and  creative...well as much as I can be! Anyway, I decided to make her a pretty bottle to sit next to her kitchen sink with dish soap in it. I think it came out pretty.

Here's how... I went to Home Goods and purchased a pretty glass bottle, went to the Dollar Tree and purchased some flowers, ponytail holder and some dish soap. That's it!


I put the ponytail band around the bottle, hot glued one flower under the band and filled the bottle up with the dish soap!

And here is the finished project!
And she loved it! 


We celebrated her birthday at a Crab Feed. The Crab Feed was really good, they had wine, bread, shrimp salad, clam chowder, pasta and the crab was excellent. We had a really good time and after the Crab Feed they had a dance, that was fun too! :) 


Wednesday, January 29, 2014

Pork Chops for the Slow Cooker

Well the last time I left you I was talking about California officially being in a drought. Well today is the 52nd day of one of the longest stretches in California history since 1849 when they started measuring precipitation for the State. However, the weather forecasters say that a storm is coming with measurable precipitation... a 1/2 inch to 1 inch in the Sacramento Valley starting around noon time (none so far) and into the night hours were it will be heaviest , so we shall see.

So, I've stayed in today because secretively I'm enjoying the overcast dreary day...I've missed winter. I wanted to find a new recipe for some pork chops I had in the freezer so I came upon this one that looks yummy over at www.allrecipes.com . So I'm trying it, however I did change a few things, but I'll post the original recipe then I'll tell you the changes I made.

Original Recipe makes 6 servings

  1. 6 boneless pork chops
  2. 1/4 cup brown sugar
  3. 1 teaspoon ground ginger
  4. 1/2 cup soy sauce
  5. 1/4 cup ketchup
  6. 2 cloves garlic, crushed
  7. salt and pepper to taste
Directions


  1. Place pork chops into slow cooker. Combine remaining ingredients and pour over pork chops.
  2. Cook on low setting for six  hours, until internal temperature of pork chops has reached 145 degrees F (63 degrees C).


Here are my changes: I used 1/2 cup each of brown sugar, soy sauce, and ketchup, 2 cloves of garlic, minced and pepper. I left out the ginger and salt (soy sauce is salty enough). I let it cook in the crock pot on high for 2 hours, then on low for another 2-3 hours.


I will have to come back and up-date how the pork chops come out with a picture and let you all know if we have rain!

Until then have a fantastic day!

UPDATE:

Okay this recipe is definitely a keeper! I paired it with white rice and some broccoli so yummy!
I'll be making it again, it was so easy! :)


Saturday, January 25, 2014

Hello it's been awhile! Happy New Year I hope everyone is doing well so far. Wow, California seems to be in a holding pattern and just skipped winter all together! Yesterday it was 78 degrees here in Northern California, just crazy. Not that I'm complaining about the weather, but we officially are in a drought here in California now. Boo! So hoping that something will change soon and we'll get some much needed rain. I hope everybody enjoys their Saturday. In the mean time I'd like to leave you all with a picture of where I live out here on the Sacramento Delta, paradise! Until next time. Enjoy! 
Sacramento River Delta

Sunday, August 4, 2013

I wanted to share with you today about how to make a simple enchilada sauce instead of buying expensive enchilada sauce at the store and it's much tastier. I always make sure that I link my stuff up and give credit where credit is due. www.pomanmeals.com

INGREDIENTS:

Homemade enchilada sauce-

2 tablespoons vegetable oil
1/2 onion-chopped fine
3 cloves garlic- minced
4 tablespoons chili powder
1 tablespoon cumin
1/4 teaspoon Italian seasoning
2 tablespoons cornstarch
1 cup chicken broth- *I use bouillon based
1 cup tomato sauce 

INSTURCTIONS: For the homemade enchilada sauce - in a medium sized pot, add the vegetable oil over medium heat.  Add in the garlic and onions.
Add the seasonings over the onions/garlic and stir.
Saute for a few minutes until the onions are slightly tender and the spices are toasty.
In a small bowl, whisk the cornstarch into the chicken stock. Pour the chicken stock mixture into the onion mixture slowly, whisking until everything is well blended. Stir in the tomato sauce. 
Bring to a boil and reduce to simmer for about 10 minutes or so, until thickened. This sauce is great to make ahead or double up and freeze. It will be ready for you anytime you want enchiladas. No canned sauce here! 

UPDATE-
Hubby and I made this sauce tonight and we both feel something is missing. We believe there is too much chili powder in the recipe. I'm going to try to cut the amount of chili. Stay tuned! 


Wednesday, July 3, 2013

Cutest Baby Mobile


This is really a cute baby mobile! I ran into it over at godblessournest.blogspot.com  - Here goes!


It really is very simple to make, just a little time consuming. All you need is:

1) A wire wreath frame. You can pick it up at Michael's or Hobby Lobby for a few bucks. The one pictured is the 12" wreath, but they have larger and smaller sizes it's up to you. Spray paint it whatever color you want. 


2) Chandelier Crystals. The ones used in the picture are octagon-shaped, clear, 18mm, and have 2 holes (one on each end). I hear you can purchase these crystals on Ebay or Etsy.


3) Fishing line. To hang the crystals use #6 pound test and to hang the mobile use as large as you can find, like #30 pound test so the mobile will be secure.

4) Fabric or whatever you decide to use to hide the wreath frame (or you can just leave it painted, it's up to you). Pictured above muslin was used, but use your imagination. 

5) Sheetrock anchor with screw. Get something pretty hefty, like something that supports over 25lbs. 


Okay, first spray your wire frame (whatever color) let it dry. Then start tying the support strings first. Use the thicker fishing line for this. Cut 6 pieces of string about 2 feet long. One for each little "bump" in the wire frame. Tie one end of each string to the "bump" and then tie the other end of all 6 strings together. You can see what I mean here: bring them all up and tie them off.


The important thing is making sure the 6 stings are all the same length so it hangs level. If just one string is off, it will hang sideways (or "cattywampus" as I like to call it). Once you are sure it's level, go ahead and tie 2 or three more knots where all the strings come together. Then tie one long string to this knot (again, tie 2 or 3 knots). This is the string you will use to hang the mobile from the ceiling. Find something in your house you can temporarily tie it to while adding the crystals. This will save a lot of time from untangling.

Now add your crystals. The crystals have a hole on each end, so use separate pieces of string (#6 pound test) for each individual crystal. You don't have to measure the lengths of the line because you want it to be random in length. Some strands have two crystals, some three, some long, some short. Tie strings on the outer and inner rim so they won't be too close and tangle. Make sure you double or even triple knot tie everything, and give them a little tug once you get it on the frame to make sure it's secure. You don't want them falling in the crib! 

Now add your ruffle or whatever you decide to decorate the mobile with. 

If you're going to make this be patient, it's time consuming.

Now hang the mobile from the ceiling, but make sure you are using the right material. If you're not sure ask someone at the hardware store that knows a little bit about hanging something you want to be sturdy and not fall.

Enjoy!